I'm looking for...

Thursday, December 29, 2011

Pattern sales

What are you still doing here?
Simplicity pattern sales, for 0.99$ at http://www.patternsewing.com/!
Yes, that's right!
Go ahead, I just placed my order!
Do you want to see what I ordered?


2700

Because I do have to improve my skills at pants fitting.


I also ordered a few new McCalls patterns, since I will get charged with postal anyway!


Mac Calls 6518


Mac Calls 6505


Mac Calls 6489


See you around
Maria

How to narrow an one-piece waistband of a ready made pant

    Hello every one! Merry Christmas! I hope you all had a nice family time and the hand made gift, you probably gave to people you love, got really apreciated. I've always been really curious about that. I imagine people look very excited when we offer them a hand made gift and then, when they are alone, they would be observing our masterpieces with curiosity! Haha!
   
    I'm copying here my "How to narrow an one-piece waistband of a ready made pant" tutorial, to have them all together, under the "tutorials" tab.

1.   I always have been narrowing the waist of the pants I buy, because I have a narrow waist and wide hips. The result wasn't always the best, usually depending on the fabric or how long my top was going to be...to cover up the waistband... Now I believe I've got it! See if the waistband is one piece, there's no guide-seam to follow or an easy way to add darts if needed. I hope I'll help you guys. It worked for me!


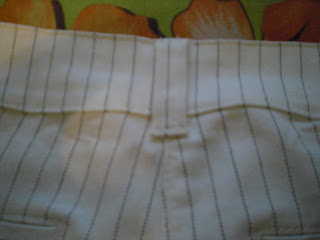
This is how it looks at first.


2.   Firstly, undo the seam of the waistband right where the centre back seam of the pants is (take away the belt keeper if there's any) and cut the waistband right in half. I wanted to narrow the waist band 4 cm, so cutting it in the middle works just fine.  Make sure to try on the pants first and measure the excess fabric!


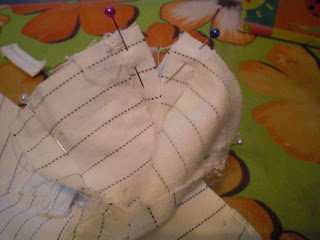
3.  Now pin together the four pieces of the waistband and sew them, according to your measurement. You may undo only the stitch of the waistband that holds it to the pants and not the seam that holds the two pieces of the waistband together. I had to do it in this pants, otherwise it is easier to treat it as one piece.


4.  Cut the extra fabric and leave about one cm for seam allowance. Steam press open and give the waistband it's normal shape.


5.  Now you have to narrow the pants part too. Pin and stitch, creating a dart. I started at 2 cm (2+2 =4 cm narrower) as I did in the waistband and ended at 0.... it's a dart!


     If you have to get rid of a lot of fabric, more than 6 cm, you better do this: follow steps 2-5 as above and in step 5, instead of making one big dart in the center seam of the pants, you should do two smaller ones, right in the center of every pant part.
     So if you have to narrow your waist in 8 cm, narrow your waist band following steps 2-4. Then divide 8 by 2 =4, so you have to make two darts of 4 cm each, which means 4 divided by 2 =2, each side of the dart has to be 2cm. Measure the upper part of your pant part, note down the center and draw a dart, 2cm on one side of the center, 2cm on the other side. Sew carefully ending to 0cm. Repeat that to the other side of the dart.


6. Most of the work is done! Add any decorative stitches if your pants originally had them. Now sew the waistband to the pants.


You're done! It looks as it did at first, but it's not the same...look at the lines!!! Good luck!


See you around
Maria


I wish you all a Happy and Creative New Year!

Wednesday, December 21, 2011

New McCall's patterns

   for spring 2012. I know it's too early. Winter has not shown it's real face here yet, but we can think of sewing ahead, right? I couldn't help but noticing these cute patterns.

M6518 
This would be lovely for the office and I do have a lot of waist belts to match it, hmmm let's think about it...

M6505  
I so want this and I did get a new lace the other day! That pattern is ideal for lace, look at the minimal seams.

M6514 
Not really my style, but it sure would be comfortable for dance class.

M6531 
I loooooove the raglan sleeves so much.

M6517 
Isn't the transparent one an interesting idea? I wonder where I could find suitable material for that ... and if my machine will like to sew it!

M6519 
Multiple pattern envelopes! My favorites, jacket, top, patns, dress and skirt.

M6489 
Last but not least, an ideal dress for strech knits. I'm so glad to see a sleeved version! Why don't they have dresses with sleeves?


See you around
Maria

Thursday, December 15, 2011

I have a cursed dress

    Let's take things from the beginning. About a month and a half ago I had to go to this wedding. I had one week time (excluding work and sleep hours) to sew a new dress, because, as every woman, I have an empty closet!
   I looked through my patterns and I found the perfect one. Simple but elegant. Long, black, made of satin crepe, while using both sides of the fabric, front slit. Just perfect. It is pattern 110 from BWF 12/2006.
   So I went fabric shopping and I found the exact same black satin crepe! Can you  imagine my joy? On a very good price too. I got all my notions and I headed home with a big smile on my face.
   I cut the pattern pieces, sewed up a muslin, tried it on and ohhh so perfect. A few dart adjustments, as always, a little bit on the shoulder and let's make that decolte a little wider... perfect! I transfered the alterations on the paper pattern and I was on fire and on schedule! It was Saturday night.
    In the following days I cut the fashion fabric and I begun to sew. Everything was going smoothly. I decided not to line the dress. I was calm, concentraded and I was progressing fast. ...until I realised that for a while I was sewing with long stitches. I check and recheck my sewing machine's setting and what I had chosen was not what my machine was doing. While trying to adjust everything from scratch, I heard a snap. Something broke...
   So I'm standing still, not breathing, having a half finished dress on my lap, while the clock was ticking, staring at a broken machine. Come on sewing machines don't just break. What on earth happened? I pulled my self together and I tried making a couple of stitches on a scrap piece of fabric. My machine was still sewing in big basting stiches, as before. And that was the only thing "she" could do. No adjustings and settings allowed, not even zic zac in big basting stitches. Only straight basting stitch. Just 4 days (working days for me) before the wedding. Crap...
  No time to take the machine for a repair, no alternative choice for what to wear that day. So I settled down with my options and decided to keep sewing, even with basting stitch. After all the dress is black, my fabric is good quality and I know how to make things work. And I did. I had mittered corners, self faced seam allowances (no zic zac stitch remember?), hong kong finished hem, hand sewn front slip. I had everything a night gown calls for. And I looked stunning in it!
    I went to the wedding and a couple of days later my machine went to the "doctor". Now she's back and all healthy. The "doctor" said what happened to her was very weird!
    For the next weeks the dress had been sitting on a chair waiting to be hand hemmed again, because my heel ripped of the old hemming while dancing. By the way I haven't still done that and I'm not sure if I will!!!
   Last Saturday I decided to photo shoot me, with the dress on. I hadn't done it so long, because I was hopping I would get the chance to take some pics in the sunshine, but since that never happened...
   So I got all dressed up, cleaned the room, made my setting, fixed the tripod, took my camera off it's case and it slipped right of my hands, fell on the floor, not on the carpet, on the floor and it broke. Now it's totally dead. I can't turn it on, the lens won't move a bit. Took a big breath, took the memory card out. I had taken a test shoot with the dress. My PC won't read the memory card.
   So let's think about this again :
   - while I was sewing the dress my sewing machine broke down
   - while I was photo shooting the dress my camera broke
   if that's not a curse what is??? I swear to you, I wanted to scream so hard and rip that dress off.
   To be honest with you, I didn't try hard enough to "read" that memory card. I'm afraid that the moment that picture will be on my PC's screen, my PC will shut off and never turn on again! I'm afraid that if I manage to upload that single photo on my blog, my blog will be forever erased! I'm afraid you'll have to settle with this story and no photos. The cursed dress is folded in the bottom of my closet and will remain in the dark for a long long time!

   The bad news is that, I'm afraid, I can't blog without a camera. How will I show you my finished wrap? How will I show you my new scarf? How will I show you my Christmas crafting? Until I'll be able to fix that camera or buy a new one please be patient with me.
   That's all folks. Now I have to go write Santa a letter, asking for a new camera.

 See you around
Maria
  

Sunday, December 11, 2011

Burda Style 1/2012 preview

    Hello everybody! I'll cut right into the chase! 
This dress is the right reason to buy the January issue.


What's not to like about it? It's simple, elegant, with draping details, 
fully covers one shoulder, so it can be for winter or summer.
It's just lovely and the side zip version is so hip!

Another version of it, for a more fairy like look!


If you are looking for one more reason, this is the one!


This is THE feminine dress, made of suet leather for this model.
Look at the lines.
What's not to love about it?
Unfortunately it won't be suitable for a fabric with a pattern.

This is a dress that calls for satin crepe, used from both sides.
This fabric turned out to be my favourite.
I still have a story to share with you, but when something goes wrong...
it goes wrong!


I'm not really sure about that side panel,
but it looks lovely, doesn't it?

I also love this one


Yes I'm all about dresses...

Here's a jacket pattern with a unique design.


And if you're looking for a coat with a caracter


I like the obvious waist line in this one.

Beautiful cross body blouse 
(although these are not my favourites, 
I never manage to tie them and have them stay the right way)


I may give this cute little bolero a try.
It's tiny but it can pull your whole look together.


How about some pin up lingerie?


My next think to love about this issue is this costume idea!

Modell Φωτογραφία

You may take a look of the rest models in the Russian Burda Style site.

See you around
Maria


Saturday, December 3, 2011

My first pincushion!

    Do you use pincushions? I don't! I have this old metal box, that used to contain mints. I keep it close to my machine and I'm perfectly happy with it. I have a strong magnet in it too, because accidents do happen and all those pins end up on the floor from time to time.
    I never felt the need of a pincushion. I only have this cute little pig, that was actually made to be a small (too small) bath sponge, where I keep a few needles to be handy. 


    I also have a basic wrist pincushion, I use when I'm adjusting fitting, while I have the garment on. But when I saw this tutorial, by diydish.com I couldn't resist! I had to have one of my own! I waited and waited until I found the perfect candle stick to use as a base. I didn't find the perfect one. Actually I did. Ok, I'll explain. The perfect one was crystal, didn't cost much at all, but I know it wouldn't last too long. Once it fell down, it would end up in million of pieces... so I settled for this metal one, that won't break no matter what!


Isn't it cute? 
35 cm hight!


I was quite lucky to find this wooden bead in my stash. 
It used to embellish an old blouse of mine.
(Never through way a garment without taking off whatever can be used again!
I'm happy I had this, because it has just the perfect size and I didn't really like the 
idea of Christmas ornament, as they used in the tutorial.


Do you like it with pins on?
I don't really... It's weird having pins on a human body...

I say go ahead and try this pincushion. 
It's super easy. Takes no more than half an hour to complete.
It's great as a gift and if you won't use it as a pincushion (as I won't) 
it's beautiful as a decorative aspect in your sewing space.

Just don't use cotton as a filling, bad bad bad idea... take my word for it!


See you around
Maria


Related Posts Plugin for WordPress, Blogger...